DETAIL STUDY OF MEASURING TOOLS
Measuring Tool-Vernier Caliper,Micrometer,Vernier Bevel
- Vernier calipers
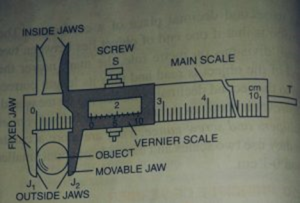
- OBJECT: To determine the radius of a cylinder using Vernier calipers
Apparatus used: Cylinder, Vernier calipers.
Formula: Radius =diameter/2 or r=D/2
Theory – Vernier calipers- It is a device to measure the length or width of any small object with greater precision than with a normal cm scale. While the least count of a cm scale is one mm. The least count of Vernier calipers is normally 0.1 mm or even lesser. Different Vernier calipers have different least counts.
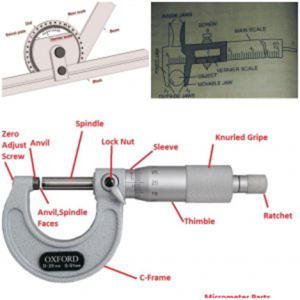
Vernier calipers consist of a rectangular steel bar graduated in inches on one side and centi meters on the other side. This is know as the main scale. Over this scale, another small scale slides called Vernier scale . The instrument has two jaws A and B. The jaw A is fixe at the end of the main scale, while the jaw B is movable. It is a part of the sliding Vernier scale. Each jaw is at right angles to the main scale. Usually when the two jaws are touching each other, the zero of the Vernier scale coincides with the zero of the main scale. If it is not so then the
instrument has a zero error. It has also the jaws protrude upwards as P and Q. These projecting jaws are use to measure the internal diameter of the tubes. The movable jaw also carries a thin rectangular rod R that is use to measure the depth of.
Parts of Vernier Caliper:
A Vernier Caliper has following parts:
- Outside jaws: It used to measure the external dimension of objects.
- Inside jaws: It used to measure the Internal dimension of objects.
- Measuring Depth Probe: It is use to measure the depth of objects.
- Main Scale (cm).
- Main Scale (inch).
- Vernier Scale (cm).
- Vernier Scale (inch).
- Retainer: It used to block the movable part.
Working Principle
The Vernier Caliper is a Precision Measuring Instrument which is useto measure length, depth, diameter of the given specimen
Working Principle of Vernier Caliper:
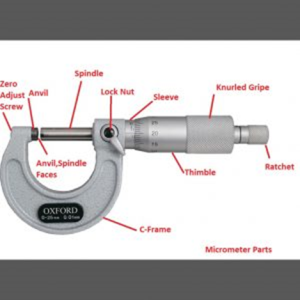
A micrometer is composed of the following parts:
- Frame – It is the C-shaped body that holds the anvil and barrel in constant relation to each other. The frame is heavy and has high thermal mass. To prevent substantial heating up, it is covered by insulating plastic.
- Anvil – The shiny part the spindle moves toward and the sample rests against.
- Barrel – Stationary round component with a linear scale on it.
- Screw – Found inside the barrel and is considered the heart of the micrometer.
- Lock nut – Component that one can tighten to hold the spindle stationary.
- Spindle – Shiny cylindrical component that causes the thimble to move toward the anvil.
- Ratchet Stop – The device on the end of the handle that limits applied pressure by slipping at a calibrated torque.
Principle of Operation
The basic principle of operation of a micrometer is as follows:
- The amount of axial movement of a screw that is made accurately can be measured by the amount of rotational movement of it.
- This is because the pitch of the screw is constant.
- The measurement made due to the rotational movement is some amplified form of the actual axial movement of the screw.
Care and Proper Use of a Micrometer
Before you rotate the thimble or the ratchet knob, unlock the locking lever. Make sure to clean the measuring faces with the help of a clean cloth before you begin taking measurements.
As you begin measuring, start rotating the ratchet knob (not the thimble). The ratchet knob will ensure you don’t overtighten the thimble, as that will not only give an erroneous reading but can damage the instrument too.
The horizontal line on the sleeve should be aligned to zero when the micrometer function is at its minimum reading. In case it does not happen, the instrument must be calibrated. For calibration, each device comes with a half-moon adjusting wrench.
Remember to use the thimble lock while the micrometer is still holding the object. If you do not do this, the spindle might move a little while taking the reading or taking the object off from the micrometer. It’s also advisable that you don’t keep the instrument exposed to the sun for long
Bevel protractor has a very vital role in mechanical architectural drawing.General use of bevel protractor is decreasing due to the introduction of software like CAD.The bevel protractor is used for testing the angles very precisely.It is used for a variety of mechanical and engineering related applications.
Construction of Vernier Bevel Protractor
Vernier Bevel protractor consist of the following components.
- Main body
- Base plate stock
- Adjustable blade
- Circular Plate with graduated vernier scale divisions.
- Acute angle attachment
The following figure shows the vernier bevel protractor
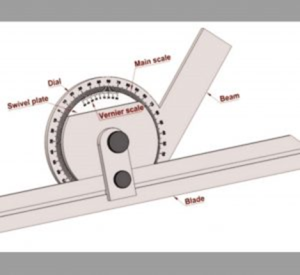
- The base plate(Stock) consisting of the Working edge will be mounted on the Main body.
- And the Acute angle attachment is also mounted on the main body.
- This acute angle attachment can be readily attachable/detachable with the Locking Nut.
- A circular plate having a vernier scale in it, also mounted on the Main body frame.
- This circular plate is carrying an adjustable blade which can travel along its length and locked at any position with the help of the blade locking nut.
- The adjustable Blade one end is bevel at angles 45° and the other end is bevelled at 60°.
- This Main body frame itself having a graduated scale called the main scale.
- The circular plate can rotate freely on the main body.
- There is a slow-motion device which helps to control the rotation of the circular plate on the main body
1. As the Base Plate (Stock) acts as one of the working edges, and the other working edge will be the blade which is held on the circular plate. as you can see the some of the sample positions of the Vernier bevel protractor in action.
2. This Adjustment Blade can be rotated along with the circular plate on the main body.
3. Which means the vernier scale on the circular plate will be rotated on the Main scale which is graduated on the Main body.
4. The Vernier scale has 12 divisions on each side of the centre zero. (It means there are 24 divisions on the vernier scale)
5. The 12 divisions are denoted as 60 min on the vernier scale (Like this 15, 30, 45, 60). That means 12 division = 60 minutes
6. One devision= 60/12 = 5 minutes.
7. On the Main scale, the same portion is represented as 23° (12 divisions on vernier scale = 23° on the main scale )
8. One division on the Vernier scale = 1.91666° = 1° 55′ (one degree 55 minutes).
9. As similar to the vernier caliper working principle as Zero on the vernier scale moves on the main scale.
10. While taking a measurement, The Zero line on the vernier scale shows the reading on the main scale, called main scale reading.
11. At somewhere The divisions on the vernier scale will coincide with the divisions on the Main scale. this reading is noted as the Vernier scale reading.
12. With these values along with the least count of the Vernier bevel protractor, we can calculate the Reading.See the following example how to calculate the total reading.
Measurements with Vernier Bevel Protractor
Consider the Following is a reading of an angular measurement.
The total reading =the main scale reading + the number of the division at which it exactly coincides with any division on the main scale × least count of the vernier scale.
In the above case
The main scale reading = 10°
Vernier scale reading (the number of the division at which it exactly coincides with any division on the main scale) = 3rd division
Least count of the vernier Bevel protractor = 5 Minutes
The total reading = 10°+15 minutes = 10 + (15/60) = 10.25°
OTHER MEASURING TOOLS
Tape Measure
It’s the essential measuring tool for a reason: though small in size, it’s useful on darn near every project. I say buy them in bulk and keep one in every room of the house; you’re likely to misplace them.
Quick tip: when trying to achieve accurate measurements with a tape measure, hold the 2″ line on the edge, take your measurement, and then subtract two. This gives you a much more accurate measure than taking it from the little jiggly metal thing at zero.
2. Combination Square
This is my number one measuring multitasker when doing any kind of woodworking, art, or design project. Use the head to set 90° and 45° angles and the adjustable ruler to scribe a line over a long distance. You can find less expensive plastic combination squares for around $20, but I recommend saving up for a high-quality model, $40-100, which will last longer and provide much better accuracy.
3. Micro Rule
This might not get you very far when adding a room to your home, but if you have one around, you’ll find all kinds of uses for it. These small rulers measure in 32 ends and 64 ths, making them great tools for setting up bit and blade depths on power tools, not to mention an infinite number of little household repair jobs. I use mine all the time.
RELATED LINK

