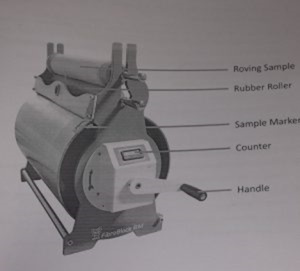
Wrap Reel lea count tester
INTRODUCTION
Its is use to prepare samples of sliver, roving and coarser yarns of a predetermined length to determine the linear density (count).
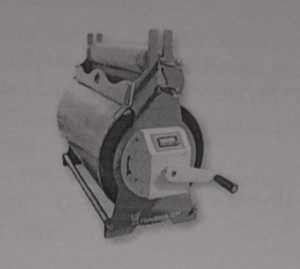
This instrument is an ergonomically design table top model with rugged steel body construction for better stability and quality performance. Carefully finished drum surface with self loading top roller design ensures slip – free feeding. A resetable digital counter activated by drive shaft records the length of the sliver passed through the drum. The drum circumference is 1 yard with 14 “width, which facilitates accommodation of roving up to 18” lift.
Check upon Delivery
The instrument has been strictly and well packed. In consideration of various factors during the transportation should be pay to the following points before the installation. If there is anything abnormal please notify the Agent or relevant people of our company.
→ Check if the instrument has got any demage or deformation during the transportation.
→ Check if there is something wrong on the inner parts wiring and circuit board.
2. SAFETY
While designing the instrument, great care has been take to minimize the risk of operator injury.
Safety Symbols
ATTENTION
MAINS (Power Supply)
FUSE
ROTATING PARTS HAZARD
HOT
Safety Precautions
Observe the regulations stated in this guide with a view to achieve maximum safe operating of the instrument. If the operator finds any difficulty, contact the person who can guide by going through this manual
1. Always keep the instrument secured against unauthorized handling and use.
2. Do not cross the path of the moving carriage during operations. 3. Never remove any cover when the instrument is connect to the main supply.
4. Always keep the instrument free from dust
3. TECHNICAL SPECIFICATION
Drum circumference:
1 Yard (914,4 ± 2 mm) as standard supply for Imperial measurement
1 Meter (1000 + 2 mm) as specific supply for Metric measurements
Drum width :14 inch (354 mm)
Bobbin Accommodation : 12 to 22 inch; 12 “to 18” is normal and 18 “to 22” with additional Wider attachment pack which is includ in standard supply 60 mm,
Top roller:coated with natural rubber and carefully controlled mass
Counter :8 digit digital battery powered LCD counter (at least count: 1 )
Applicable standards: IS 4952
Physical Dimensions :Size(WDH): 670 x 263 x 482 mm Weight: 45.5 kg (Accessories included).
Procedure
1. Place the instrument on a flat surface.
2.Display in indicator shows “O and or eise Press the reset switch before turning the wheel.
3 .Place the sliver or roving bobbins in its place and lift the pattern up to Har on the wheel by hand and lift the feeder roller.
4.Rotate the wrap wheel using the handle to the require specimen length and stop rotation when is complete.
5. Cut and remove the specimen from the starting point.
6.When done, press “Zero Button” for a few seconds (7 to 10 seconds) LCD display is off. Before testing, press “Zero Button” LCD display starts showing 0 and follow regular test.
APPENDIX
Routine Check
1. Only a Qualified person should carry out routine maintenance.
2. Remove any dust or debris from the instrument as it accumulates.
3. Cleaning should only be carry out with a soft cloth. No aggressive cleaning agents must be use (such as solvents, paint thinners, acetone, etc.).
4. Keep the instrument in dust – free atmosphere.
5. Keep the instrument free from vibration.
Twist measuring in Yarn :
The most obvious thanks to live the quantity of twists per unit length of yarn is solely to straighten out a familiar length of the yarn and check visually to check whether or not the twist has been utterly remove.
General specification needed for twist measuring
Twist testing strategies depends on the specification, accuracy, demand, from of the sample etc. normally the subsequent points is also follow for obtaining reliable result. They are-
sometimes twist isn’t distribute uniformly on a yarn. Speaking technically, the number of twist in an exceedingly materials is reciprocally proportional to its thickness.
This from is ‘twist x weight=constant’’. And for to avoiding having bias in twist measuring, twist ought to be determine at mounted intervals on the yarn that’s one yard of distance that is appropriate.
Withdrawal of yarn over the tip of the package adds twist to a yarn, whereas withdrawal from the facet of the package doesn’t.
Withdraw the yarn from the package in the same manner it will be use in the next stage of processing. Mount the package vertically on a peg, allowing it to rotate freely as you gently pull the yarn from it.
When handling the test specimen, avoid touching the section where the twist will be measure to ensure accurate and reliable results.
For plied, cabled yarns, and continuous filament yarns, test at least twenty specimens, each 500 mm long, as per BIS (British Standards Institution) guidelines. For single yarns, BSI recommends testing fifty specimens, each 25 mm in length.
Maintain constant tension on the test specimen during the procedure. BSI specifies a tension of tex/2 ±10% grams. For example, for a 40s NeC yarn (approximately 15 tex), maintain a tension between 6.35 and 8.25 grams.
Techniques of twist Measurements
The most common techniques that are use for activity yam twist square measure listed below.
❶ Straightened fiber technique or the direct count methodology.
❷ Twist contraction technique or the straighten out and re-twist methodology.
❸ Twist to interrupt technique.
❹ Microscopic
❶ The straightened fiber technique
(A) Straightened twist tester
Principle:
This method, use exclusively for testing single spun yarns, involves untwisting the test specimen until all twist is remove. The tester verifies complete untwisting by visually examining whether all the fibers in the strand have straightened—hence the name “straightened fiber technique.” The operator counts the number of turns required to untwist the yarn and then divides that number by the test specimen’s length to calculate the twist in terms of turns per unit length.
This technique, known as the “direct count method,” gets its name from the process of directly counting the number of twists in the yarn.
Construction:
The figure below shows the key components of a yarn twist tester that uses the straightened fiber technique. The instrument features two vertical pillars, A and B, mounted on a rigid base C. Pillar A supports a fixed jaw D, a yarn guide E, a tensioning device F, a magnifying lens G, and a flat surface H. Pillar B holds a movable jaw I, which the operator can manually rotate in either direction using handle K. A revolution counter J records the number of rotations.
A 25 mm (or 1 inch) length—commonly used as the test length—separates the faces of jaws D and I. The test specimen L is clamp securely between these two jaws.
Straightened twist tester
Test Procedure:
The first step is to line the revolution spystealth counter to zero.
Next clamp the take a look at yam within the mobile jaw. Open the static jaw and lead the yarn through it then over the guide pulley; attach alittle weight to the yarn to present it the specified tension then shut the jaw to clamp the yarn.
Check, by suggests that of lens G if necessary, the twist direction of the take a look at specimen. Then victimization the handle, rotate jaw I in an exceedingly dextral or anti-clockwise direction therefore on straighten out the yarn.
Note the twist being remove from the yarn. Once you have removed most of the twist, insert a sharp needle through the center of the partially straightened strand so that it nearly touches the fixed jaw. Then, while looking through magnifying lens G, gently move the needle toward the opposite jaw.
provide the handle a final rotation either manner till the needle is within the nighest doable position to the mobile jaw.
Finally, the quantity of turns of the mobile jaw needed to straighten out the take a look at specimen is browse off the revolution counter and recorded.
Twist contraction technique or the straighten out and retwist methodology
Principle:
lso called the twist-and-retwist method, this technique works on the principle that the twist in a given length of yarn, when placed under tension, can be removed by untwisting it. This untwisting causes the yarn to increase in length. The operator then reintroduces the same amount of twist into the yarn—but in the opposite direction. As a result, the yarn returns to its original length (e.g., changing from Z-twist to S-twist, or vice versa). The operator records the number of turns required to untwist and then retwist the yarn, and calculates the TPI (twists per inch) accordingly.
The change in length observed when twisting a strand of parallel fibers in one direction generally equals the contraction seen when twisting it in the opposite direction.
Untwist-Retwist methodology
Twist contraction: The twisting along of 2 strands causes a contraction impact that has got to be famous so as to calculate the count of the plied yarn accurately.
Twist Contraction Principle
The twist contraction principle holds true even when twisting a strand of parallel fibers or filaments.
In general, if the original length of the strand before twisting is L, and the twisted (shortened) length becomes L₁, then the twist contraction (C) is calculated as:
C = L – L₁
Extension During Untwisting
If you untwist a yarn of length L₁ until it becomes completely straight, the resulting strand regains its original length L, assuming no tension loss.
Contraction During Retwisting
If you retwist the straightened strand in the opposite direction to the original twist, and insert the same amount of twist, the yarn once again contracts back to length L₁.
Twisting–Retwisting Process
A typical tension-type twist tester operates on the twist contraction principle, especially for single spun yarns.
Construction
The instrument includes two vertical pillars mounted on a solid base:
One pillar carries a fixed jaw, connected to a tension scale with a sliding weight. The weight can be positioned as needed on the scale. The bottom end of this scale has a pointed tip, serving as a precise marker. The scale itself acts as a miniature tension gauge.
A reference mark is placed at the base of the pillar to monitor extension or contraction.
The other pillar holds the movable jaw (I), connected to a handle and a revolution counter through gears.
The gear ratio is calibrated to directly show the TPI (twists per inch) on the counter after completing the test.
The mechanical counter displays four digits: the first two represent whole numbers, and the next two represent two decimal places.
A zero-reset knob allows the user to reset the counter before each test.
The yarn specimen is mounted between the fixed and movable jaws.
Standard specimen length is usually 25 mm or 1 inch, although some instruments allow users to adjust the length by sliding the fixed jaw pillar along the base.
Tension-Type Twist Tester: Test Procedure
Set the sliding weight on the tension scale according to the count of the test yarn and the instrument constant.
Instrument manufacturers typically provide a formula to determine the correct tension setting.
(Example: A specific manufacturer may recommend a formula such as Tension (g) = tex/2 ± 10%.)
Tension scale reading = 156/English count
Yarn Mounting and Twist Measurement Procedure
Begin by gripping the yarn from the test package in the fixed jaw of the twist tester. Then, guide it through the movable jaw. Pull the yarn gently until the knife-edge tip of the apparatus pointer aligns precisely with the fixed index mark at the base. Once aligned, close the movable jaw.
At this point, the yarn is under the recommended tension and has a gauge length of 10 inches.
Next, use the zero-set knob to reset the mechanical counter to zero.
Determine the twist direction of the test specimen—if needed, use a magnifying lens for clarity. Turn the handle in the appropriate direction to untwist the yarn.
As you remove the twist from the 10-inch specimen, the yarn begins to extend, reducing the tension. This causes the pointer to move away from the index mark until it reaches its resting (vertical) position, indicating that all twist has been removed.
Continue rotating the jaw in the same direction to insert twist in the opposite direction. Keep twisting until the pointer returns exactly to the index mark.
This method follows the untwist and retwist principle, where twist is first removed and then reinserted in reverse. The reading on the revolution counter gives the Twists Per Inch (TPI) of the test specimen.
Twist-to-Break Technique (For Historical Reference)
Though no longer widely used, the twist-to-break method is noted here for historical interest. This technique is unreliable for routine testing.
Principle:
Twist a short yarn specimen in one direction until it breaks and record the number of turns (N₁). Twist another specimen of the same length in the opposite direction until it breaks and record the turns (N₂).
Calculate TPI using the formula:
TPI = (N₁ – N₂) / 2
Microscopic Twist Measurement Technique
This technique suits research and special yarn modeling rather than routine quality testing due to its slow process and limited sample coverage.
Principle:
Use a microscope with a graduated rotary stage to measure the spiral angle of the yarn twist. Also, measure the yarn diameter. Using these two values, calculate the twist per unit length.
RELATED LINK